Blog

A collection of links, articles and stories.

Posts tagged audiophile
The New iTunes Mini Player

The iTunes Mini Player has always been a feature I’ve stayed away from: it never helped me browse, queue up or enjoy my music in new ways. With the latest update, however, that’s all changed. I now find myself making heavy use of it.

Here are some reasons why:

  • Playback controls from within the mini player, including being able to add the current playing song to playlists or start a genius playlist
  • AirPlay controls
  • Up Next access allows me to queue up songs to play after the current track finishes — or stop playback when the current song ends
  • Search feature allows me to find and queue up any song within my music library
  • Beautiful artwork display, with a user interface which fades away when not being used
  • Mini Player hovers above all other OS X windows allowing me to enjoy artwork whilst doing other work — it’s even possible to hide the “Up Next” or “Search” drawer at the bottom of the window so only the artwork is visible

This update to iTunes seems to be one of the most profound in recent memory: whilst the upgrade to iTunes 11 was arguably a bigger undertaking, Apple has now really brought the Mini Player up to the next level. Music enthusiasts and casual listeners alike should enjoy all the new features. To get started, just click the icon next to the “Full Screen” button on the top right of the full iTunes window.

compact-mini-player.png

The compact mini player is now a beautiful artwork viewer, too: apps like Bowtie are now almost unnecessary if you want to just enjoy your artwork whilst doing other things.

Brilliant update.

Groove for iOS

Gabe wrote a sweet review of Groove for iOS, a music player designed to be a different way to experience your library of tracks on iPhone or iPad. If music is something you enjoy, you might want to check the review out.

Groove is certainly miles away from iOS’s default music app, and as I’m a bit of a music nut, I bought it and am enjoying it.

It hasn’t replaced the Music app in iOS for me (I still use it for pre-made playlists), but it’s a nice addition when I want to be surprised. I consider Groove the iOS equivalent of a “Genius” style feature, wrapped up as an app. And, as that, it rocks.

How to Best Manage an iTunes Library Without iTunes Match: Wi-Fi Sync and the Case of the Audiophile

iTunes Match is a great addition to iTunes for the average music lover, but it does have some flaws. This article is mainly a guide explaining how I go about syncing my iPhone with my iTunes Library—and why.

When turning on iTunes Match, a lot of control over your music is handed to iTunes and simultaneously taken away from you. If you have a large music collection of imported CDs, when iTunes Match is first enabled it will attempt to find matches for these albums by comparing them to songs in the iTunes Store. Sometimes these matches are far from accurate, and this can lead to your iOS devices not having true representations of your iTunes Library.

Even if iTunes correctly matches a song, however, it will match it as a 256kbps AAC file—it'll be the exact version present in the iTunes Store. This can be seen as a great benefit if you imported your beloved albums at an extremely low quality years ago, however for audiophiles, this is a warning sign. Even Apple Lossless files will be transcoded down to 256kbps when iTunes Match uploads them.

Many of the albums I have imported into iTunes are remasters, live albums, and other rarities which aren't present in the iTunes Store. iTunes Match incorrectly matches these files regularly. Even if iTunes Match correctly matched them, I won't have access to my lossless files on my devices: all music in iTunes Match, when matched, is 256kbps. If the music in your iTunes Library isn't matched, it will be transcoded down to a maximum quality level of 320kbps and uploaded. For audiophiles dealing with lossless files, this isn't acceptable1.

For most people, not having to worry about backing up a large music library or knowing the quality of every album you own is a feature. However, I find the control I lose over these details is not worth the added convenience. I'm not most people.

People care differently for different things. I consider myself more of a music enthusiast than the average person—I frequent audiophile websites, I've invested money in quality headphones and I care about the quality and experience of my entire music setup. This is why I've gone to lengths to perfect it.

iTunes Match is Awesome, Really

Even though this post seems very anti-iTunes match, I'm not criticising it. Far from it: I recommend it to family and friends regularly: it's a great service which is convenient, clever and solves real problems. Before turning iTunes Match off, I matched a lot of my albums, improving the quality of music I'd imported from CD a long time ago. iTunes Match boosted the bit-rate of a large chunk of my music library and I still enjoy those 256kbps AAC files today. If anything, I'm the problem here: my own obsessions and compulsions implore me to find a different way to sync music. A way which doesn't involve a loss of quality at any stage, or rely on my iPhone's data connection when I'm out and about2. A way which I'm in control of.

What I Want

I have some quite tough requirements for the way I want to manage and listen to music. This list covers them:

  • I want to choose which songs are stored on my iOS device on the device itself, without having to connect it to my Mac—at least not regularly. I would like to be able to add or remove an album or song from my iPhone without sitting down at my Mac.

  • I do not want to be limited by audio quality. If I rip an album in Apple Lossless on my Mac, I want to have that exact ALAC file on my iOS device too.

  • I want full control over metadata, album art and audio files themselves. I want the true version of my iTunes Library to be the one present on my Mac: one I control. I'm aware this makes me more vulnerable to issues such as data corruption, data loss or even theft, however I have a sturdy backup plan which should3 prevent this from being a great concern.

  • I do not want to rely on streaming music, or even my iPhone's data connection. iTunes match heavily relies on a data connection and streaming in order to play music from a Library in the Cloud when away from Wi-Fi. I want to have my most important tracks on my iPhone, playable even when in Airplane Mode.

The Setup

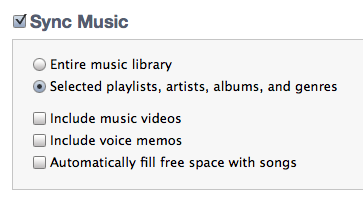
What follows is a step-by-step guide, detailing what I believe to be the most convenient way to manage music on an iPhone without iTunes Match enabled. I am using an iPhone 5, running iOS 6 and a Mac running the latest version of Mountain Lion and iTunes 10. As I write this, I am performing each step myself: everything should be correct at the time of publishing.

Disclaimer: This article was written before iTunes 11 was released. It still holds true, however. Some of the screenshots may have changed slightly in this major new version of the software, but I still manage my devices the same way, and it works fine.

  • Grab your iPhone. Ensure iTunes Match is disabled. To do this, navigate to the Settings app, then Music > iTunes Match. The checkbox should be in the off position.
iTunes-match-disabled.png
  • At this point, if you have a copy of all your music on your Mac, it will be a good idea to delete all the music on your iPhone(even if iTunes Match is disabled, already downloaded music will remain unless manually deleted). This can be done by launching the Settings app, navigating to General > Usage, swiping on All Music and tapping delete. The Music app should now be empty.
music-delete.png

I recommend powering off and rebooting your iPhone after this step. If iTunes is running, I recommend quitting it whilst your iPhone is powered off, too. This is because iTunes may still think iTunes Match is activated on your iPhone—a reboot should force both the iPhone and iTunes to re-check and update accordingly. This may only be a concern if you were previously syncing with your Mac, with iTunes Match enabled on your device. I was.

  • Connect your iPhone to you Mac and launch iTunes. On the Summary tab within iTunes, ensure "Sync with this iPhone over Wi-Fi" is checked. Don't press Apply yet. For now, keep your iPhone connected to your Mac.

Important: Before pressing Apply, navigate through each tab at the top of iTunes and ensure only the items you want to sync are checked. For instance, everything on the Info tab is taken care of by iCloud for me, so every checkbox remains unchecked. I manage apps on my iPhone and do not sync them with my Mac, so under the Apps tab, "Sync Apps" is unchecked. In fact, the only options checked for me at this point are Tones and Photos. If you connect your iPhone to your Mac regularly, you may already have some of these turned on. If this is the case, ensure they are all as you want them. I do not know how you want them, they may very well differ from mine.

When one of these checkboxes is unchecked and a user checks it and presses Apply, all the data related to that checkbox is erased from the iPhone and replaced with the chosen data on your Mac. For example, if you have lots of books on your iPhone from your time downloading from the iBooks Store, but have never synced your iPhone with your Mac, checking this box, if unchecked, will replace all your iBooks on your iPhone with the iBooks on your Mac. Effectively, this will delete all the iBooks on your device. Be careful out there.

I recommend keeping Music unchecked at this point—we're going to enable it soon. If it's already checked, uncheck it, press Apply, disconnect your iPhone and follow the steps above to erase all music from it. You should have a copy of all your music on your Mac, so deleting music from your iPhone shouldn't be a concern.

mac-wifi.png
  • Once you're satisfied you won't accidentally sync or delete anything you don't want to, press Apply.

  • Once the sync is complete (it shouldn't take too long if your iPhone is connected via a cable to your Mac), ensure the Music app on your iPhone is empty. If not, follow the instructions above to erase all music. It should look like this.

empty-music-library.png
  • Now, we're starting the fun part. Create a new playlist in iTunes on your Mac. Name it something which you'll remember translates to everything on this playlist gets synchronised with my iPhone. I created a playlist called "iPhone". Add one small song to this playlist, so we can see whether the synchronisation works without waiting too long.

  • Navigate back to the Music tab of your iPhone, within iTunes. Your iPhone should still be connected to your Mac. Check the "Sync Music" checkbox at the top of the page. Ensure "Selected playlists, artists, albums and genres" is selected below. I scrolled through each list on this page, ensuring the only checkbox which was checked was my "iPhone" playlist4. Ensure your playlist, which will show in the Playlists section of this tab, is checked.

mac-music-sync.png
  • Press Apply, and wait as your iPhone is synced. If all goes to plan, you will now have one song on your iPhone: the one you added to your playlist.

  • Disconnect your iPhone from your Mac. It's time for the really cool part.

  • Install Apple's free iTunes Remote app on your iPhone. Make sure your iTunes Library is added to the app: this can be done either by enabling Home Sharing on both your iPhone and iTunes Library, or by tapping the cog icon in Remote and manually adding an iTunes Library.

home-sharing-1.png
home-sharing-2.png
  • Select your iTunes Library in Remote, navigate to the Playlists tab and select the playlist you just created. The one song you added should appear there. Tap Edit, then press the plus symbol and navigate through your Library to add another song to your playlist. Tap done when it's added.

Now you've remotely added a song to a playlist in your iTunes Library on your Mac.

  • Quit the Remote app on your iPhone and launch Settings. Navigate to General > iTunes Wi-Fi Sync. Tap Sync Now.

Your iPhone should search for your iTunes Library then sync with it, adding the song you just selected to your device.

syncing.png

Congratulations, you just synced with iTunes on your Mac without using the Mac at all.

It's not all Sunshine and Roses

It's worth noting that Wi-Fi music syncing can be quite unreliable at times: it's not uncommon for me to connect my iPhone to my Mac just because it stops the frustration of having to work out why my iPhone won't sync. Furthermore, iTunes Wi-Fi Sync works best when the iPhone is connected to power. Luckily, I have enough power cables around my house that this isn't a problem.

Syncing a large number of songs can take a very long time over Wi-Fi: it may be a better idea to temporarily disable Wi-Fi Sync, copy over all the music you want using a cable, then re-enable Wi-Fi Sync to make smaller changes in the future, rather than try and sync hundreds of tracks in one go. That's what I'm about to do.

I can now enjoy manual syncing and managing of songs on my iPhone without iTunes Match.

omerta.png

The Home Sharing Cherry on Top

Initially, this approach of only syncing certain songs to your iPhone can seem like a handicap. When walking around the house, you may want to listen to a song which isn't on your iPhone. Luckily, Home Sharing solves this problem well. Simply go into the Music app on your iPhone, navigate to More > Shared, and select your iTunes Library from the list. You now have Wi-Fi streaming access to your entire iTunes Library from your iPhone, so long as iTunes is running on a computer which is connected to the same Wi-Fi network as your iPhone. I tend to leave iTunes open on my Mac, which is almost always running, so this is a great solution for me.

The handicap of certain songs being unavailable on my iPhone when I'm away from my house is outweighed by me knowing the quality, metadata and control of my music is all in my hands. I also do not need to rely on my iPhone's data connection or the matching of iTunes Match for my music.

Not Enough? Enter iPod Classic

If you're a true audiophile and want all your music with you at all times, still under your control, I highly recommend the iPod Classic. When I started using this method to manage my iTunes Library, I accepted that I would never have all my music with me on my iPhone, so I chose a "Best Of" approach and bought an iPod Classic to hold everything—even the songs on my iPhone. I discussed my reasons for the iPod Classic further in a piece I wrote for The Industry.

iPads and iPod Touches, too

This syncing system probably works just as well for all iPads and iPod Touches which support Wi-Fi Sync, however I chose to use my iPhone for this article as I'm in the process of setting it up. I thought sharing the complex way I go about managing my iTunes Library might help someone else.

If you'd like to give me feedback, correct mistakes, or share your own iTunes tip or trick, please, shoot me an email or say hi on Twitter.


1: I consider myself to be an audiophile, however I am less obsessive about bit-rate than most audiophiles tend to be. I find the iTunes Store version of most songs to be my preferred version: there is something satisfying about knowing I haven't been responsible for the transcode of the digital file; Apple has. Furthermore, some albums which are Mastered for iTunes are only available from the iTunes Store.

2: I live in a small town in southern England. The data connectivity here is far from great; there's nothing worse than the helpless feeling of knowing you could access a song from your iTunes Library, but not being able to because your signal strength is too low. I would rather only see what I can play, and know that the quality of everything I see has been controlled by me.

3: Hopefully. I will detail my backup plan in a later article. For now, Stephen Hackett's post from August serves as a great starting point for a solid backup strategy. You can never have too much data redundancy when it comes to data you really care about.

4: Yes, it was a lot of scrolling. As I mentioned previously, I suffer from certain obsessions and compulsions. I didn't want to accidentally copy a few hundred songs to my iPhone just because I'd forgotten to uncheck a checkbox.